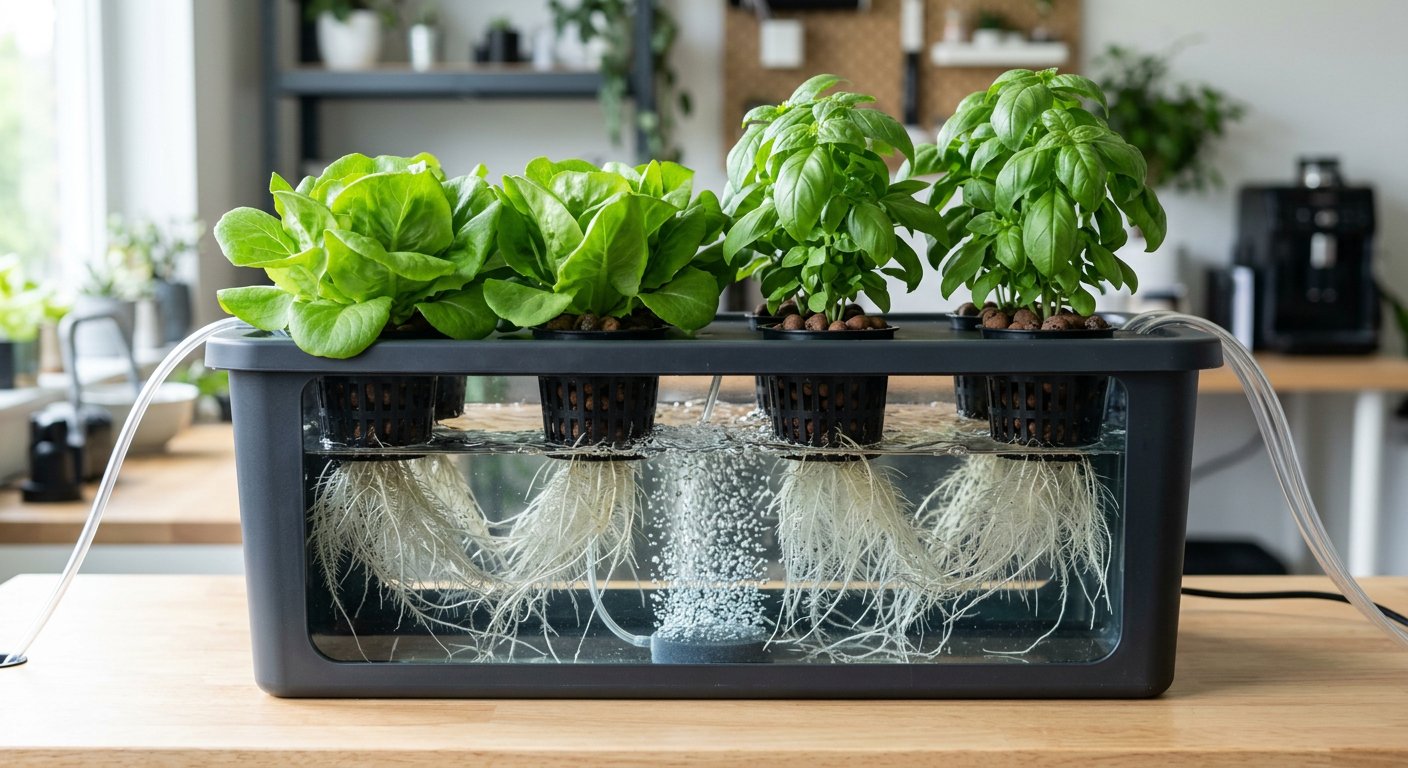
You don't need expensive equipment or a fancy greenhouse to start growing hydroponically. With less than $100 and about an hour of your time, you can build a fully functional Deep Water Culture system that will produce beautiful lettuce, herbs, and leafy greens.
We've designed this build to use readily available parts from hardware stores and online retailers. No special tools required — just a drill, a hole saw bit, and some basic supplies. Let's get building.
Complete Parts List
Here's everything you'll need, with approximate costs:
The System (~$55)
- 20-gallon storage tote with lid — $12–15 (Home Depot, Bunnings, or similar). Must be opaque (not clear) to prevent algae growth. A dark colour is ideal.
- 6× net pots (3-inch) — $8–10 for a pack of 10. These hold your plants and growing medium.
- Clay pebbles (Hydroton), 10L bag — $15–18. This is your growing medium — it supports the plants and wicks moisture.
- Air pump + air stone + tubing — $12–15. An aquarium air pump rated for 20+ gallons works perfectly. Get one that comes with tubing and an air stone, or buy them separately.
Nutrients and Testing (~$30)
- General Hydroponics FloraSeries (3-part) — $20–25. This is the gold standard starter nutrient set. One set lasts many months.
- pH test kit (drops) — $8–10. A liquid drop test kit is fine for beginners. Upgrade to a digital pH meter later.
- pH Up and pH Down — $8–10 for small bottles. You'll use very little at a time.
Plants and Starting Supplies (~$10)
- Seeds — $3–5. Start with lettuce and basil seeds. Both are fast and forgiving.
- Rockwool starter cubes (pack of 12) — $5–7. These are used to germinate seeds before transplanting into the system.
Tools You'll Need
- Drill with 3-inch hole saw bit — You probably already have a drill. The hole saw bit is ~$8 if you need to buy one.
- Scissors or utility knife
- Measuring cup
$85–$95 — well under $100! And most of these supplies (nutrients, clay pebbles, pH solutions) will last for many grow cycles. Your ongoing cost per cycle is just seeds and electricity for the air pump (about $1–2/month).
Step-by-Step Build Guide
Step 1: Drill Holes in the Lid
Using your 3-inch hole saw bit, drill 6 evenly spaced holes in the tote lid. A good layout is two rows of three, with each hole about 4 inches from the edges and 3 inches apart from each other. Mark the positions with a pencil first and drill slowly to avoid cracking the plastic.
The net pots should sit snugly in the holes with their rim resting on the lid — they shouldn't fall through.
Step 2: Set Up the Air Pump
Drill a small hole (about 1cm) near the top of the tote, above the water line, for the air tubing to pass through. Thread the tubing through the hole, attach the air stone to the end inside the tote, and place the air stone at the bottom of the reservoir. Connect the other end to the air pump, which sits outside the tote.
Step 3: Start Your Seeds
While you're building, start germinating your seeds (do this 1–2 weeks before setting up the system):
- Soak rockwool cubes in pH-adjusted water (5.5–6.0) for 30 minutes
- Place 2–3 seeds in each cube's pre-drilled hole
- Put cubes in a tray with a small amount of water (about 1cm deep)
- Cover with a humidity dome or plastic wrap
- Place under a grow light or on a sunny windowsill
- Seeds should sprout in 3–7 days
Step 4: Fill the Reservoir
Fill the tote with water to about 2 inches below the bottom of the lid. This ensures the bottom of the net pots will be submerged when the lid is on. Add nutrients at ¼ strength for young seedlings:
- FloraGro: 2.5ml per gallon
- FloraMicro: 2.5ml per gallon
- FloraBloom: 1.25ml per gallon
Stir thoroughly, then check the pH. Adjust to 5.8–6.2 using pH Up or pH Down. Turn on the air pump and let it bubble for at least 30 minutes before adding plants.
Step 5: Transplant Your Seedlings
Once your seedlings have their first set of true leaves (not just the initial seed leaves — usually 7–14 days after germination), they're ready to transplant:
- Fill each net pot halfway with rinsed clay pebbles
- Gently place a rockwool cube with seedling on top
- Fill around and over the cube with more clay pebbles until the pot is full
- Place the filled net pots into the holes in the lid
- Put the lid on the tote — you're live!
Step 6: Position and Light
Place your system in a location that gets good light. If growing indoors, you'll need a grow light — a basic LED grow panel (60–100W) costs $30–50 and will cover a system this size well. Position it 30–45cm above the plants. If you already have a sunny spot that gets 6+ hours of direct sunlight, you can skip the light for now.
Maintenance Schedule
Keeping your system healthy is simple with this routine:
Daily (2 minutes)
- Check that the air pump is running and bubbling
- Quick visual inspection of plants for any issues
Every 2–3 Days (5 minutes)
- Test pH — adjust if outside 5.5–6.5 range
- Check water level — top up with pH-adjusted water if it's dropped significantly
- Add nutrients at ½ strength when topping up more than 25% of the volume
Every 2 Weeks (15 minutes)
- Complete reservoir change: drain, rinse, refill with fresh nutrients
- Check roots — they should be white or cream-coloured. Brown, slimy roots indicate root rot
- Clean any algae or buildup on the lid or net pots
What to Expect: Timeline
- Week 1: Seeds germinate in rockwool. You build the system.
- Week 2: Seedlings develop first true leaves. Transplant into the system.
- Week 3: Visible growth acceleration. Plants start to look established.
- Week 4–5: Rapid vegetative growth. Lettuce heads start forming.
- Week 5–6: First harvest! You can start picking outer leaves of lettuce.
- Week 7+: Continuous harvests. Cut and come again for weeks.
Upgrades to Consider Later
Once you're comfortable with the basics, these affordable upgrades make a big difference:
- Digital pH meter ($25–40) — Much more accurate than drop tests. The Apera PH20 is our top pick.
- EC/TDS meter ($15–20) — Lets you measure nutrient strength precisely instead of guessing.
- Timer for grow lights ($8–12) — Automates your light cycle. Set it and forget it.
- Water chiller ($80–150) — Only needed if your reservoir consistently exceeds 24°C.
- Bigger tote or multi-bucket setup — Scale up once you've mastered the basics.
Don't try to build the perfect system on day one. Start with this simple build, learn how your plants respond, and upgrade gradually based on what you actually need. The best hydroponic garden is one you actually maintain — simplicity wins every time.
"I built my first DWC system from a $12 storage tote and a $15 air pump. Three weeks later, I was eating the best lettuce I'd ever grown. You don't need fancy gear — you just need to start."
That's it — you're ready to build. Total hands-on time is about an hour for the build, and then a few minutes of maintenance every couple of days. In 5–6 weeks, you'll be harvesting your own homegrown, hydroponic produce. There's nothing quite like it. Happy building! 🔧🌱